How to Check Screen Resolution?
Published: 5 Nov 2026
Are you confused about whether your screen is HD, Full HD, QHD, or 4K? Many users see numbers like 1920 × 1080 but do not understand what they mean or where to find them. Knowing How to Check Screen Resolution makes it easier to identify your current setting and compare it with the recommended resolution. This can help you improve picture quality and avoid incorrect display settings.
1. What Is Screen Resolution?
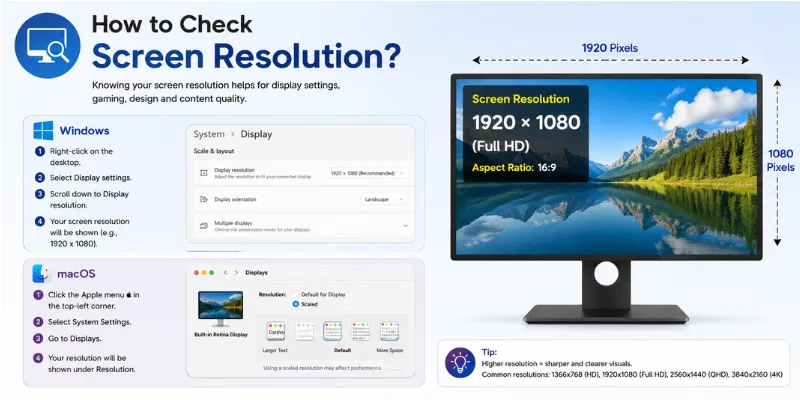
Screen resolution refers to the number of pixels displayed horizontally and vertically on a screen. It is usually written in a format such as 1920 × 1080, where 1920 represents the horizontal pixels and 1080 represents the vertical pixels. These tiny pixels work together to create text, images, videos, and other content on the display.
A higher resolution generally provides sharper images, clearer text, and more screen space. However, picture quality also depends on screen size, pixel density, panel quality, and viewing distance. For example, Full HD resolution may look very sharp on a small laptop but less detailed on a large television.
Every screen has a native resolution, which is the physical number of pixels built into the panel. Using this recommended resolution usually gives the clearest and most accurate picture. Selecting a lower resolution may make text and images appear blurry, stretched, or less detailed.
2. Why Should You Check Screen Resolution?
Checking your screen resolution helps you confirm whether the display is using the correct settings. The right resolution improves picture quality, text clarity, and available screen space. It can also help you identify common display problems such as blurry images, stretched content, or black borders.
1. Improve Image Quality
The recommended resolution allows the screen to display images with better detail and sharpness. When a lower or incorrect resolution is selected, pictures may look blurry or unclear. Checking the setting helps you get the best possible visual quality from your screen.
2. Make Text Clearer
Incorrect resolution can make text appear soft, stretched, or difficult to read. Using the native resolution usually produces sharper letters and cleaner edges. You can then use display scaling to increase text size without reducing screen quality.
3. Fix Blurry or Stretched Content
Videos, images, and applications may appear stretched when the selected resolution does not match the screen’s aspect ratio. Checking the resolution helps you identify whether the wrong setting is causing the issue. Switching to the recommended option can restore the correct shape and clarity.
4. Get More Screen Space
Higher resolutions can show more content on the screen at one time. This gives you extra space for browser tabs, documents, editing software, and multiple windows. It can improve productivity, especially on larger monitors.
5. Choose the Right Wallpapers and Videos
Knowing your screen resolution helps you select wallpapers, videos, and games that match your display. Content with the correct dimensions looks sharper and fits the screen properly. A mismatched wallpaper may appear stretched, cropped, or pixelated.
6. Check External Monitor Settings
When connecting a second monitor, the computer may not automatically select the best resolution. Each display may have a different native resolution and screen size. Checking both screens separately ensures that each one provides clear and properly sized content.
7. Confirm Device Specifications
Checking the resolution helps you verify whether a laptop, monitor, phone, or television matches its advertised specifications. For example, you can confirm whether a display is HD, Full HD, QHD, or 4K. This is particularly useful after purchasing a new device.
8. Improve Gaming and Video Performance
Resolution affects both visual quality and device performance. Higher settings provide more detail but require greater graphics power. Checking the current resolution helps you select a suitable balance between sharp visuals and smooth performance.
3. Common Screen Resolution Terms
Before learning how to check or change screen resolution, it is important to understand a few common terms. These terms explain how a display creates images, how much detail it can show, and why the same resolution may look different on different screen sizes.
1. Pixels
Pixels are tiny dots of colour that form everything you see on a screen. Images, videos, text, and icons are all created by combining millions of pixels. In general, a display with more pixels can show finer details and sharper visuals.
2. Native Resolution
Native resolution is the fixed number of physical pixels built into a display panel. For example, a Full HD screen has a native resolution of 1920 × 1080. Using the native resolution usually provides the clearest image because each digital pixel matches one physical pixel on the screen.
3. Display Resolution
Display resolution is the resolution currently selected in the device settings. It may be the same as the native resolution, or it may be set lower. When the selected resolution does not match the panel’s native resolution, text and images may look blurry or stretched.
4. Aspect Ratio
Aspect ratio describes the relationship between the width and height of a screen. Common examples include 16:9, 16:10, and 4:3. A resolution should match the screen’s aspect ratio to prevent content from appearing stretched or compressed.
5. Display Scaling
Display scaling changes the size of text, icons, menus, and applications without lowering the screen resolution. Common scaling options include 100%, 125%, 150%, and 200%. It is useful when the native resolution makes interface elements look too small.
6. Pixel Density
Pixel density shows how closely pixels are packed together on a screen. It is usually measured in pixels per inch, or PPI. A higher pixel density generally makes text and images look sharper, especially on smaller displays.
7. Refresh Rate
Refresh rate shows how many times the screen updates its image every second. It is measured in hertz, such as 60 Hz, 120 Hz, or 144 Hz. Refresh rate affects motion smoothness, while resolution mainly affects image detail and sharpness.
8. HD, Full HD, QHD, and 4K
These names describe common resolution categories. HD usually means 1280 × 720, Full HD means 1920 × 1080, QHD means 2560 × 1440, and 4K UHD means 3840 × 2160. These labels make it easier to compare display quality without reading the full pixel numbers every time.
4. Screen Resolution Types
Screen resolutions are grouped into different categories based on the number of horizontal and vertical pixels. Each type offers a different level of sharpness, detail, and screen space. Higher resolutions usually look clearer, but they also require more powerful hardware for gaming, editing, and video playback.
1. HD – 1280 × 720
HD stands for High Definition and has a resolution of 1280 × 720 pixels. It is commonly found on older televisions, budget laptops, and smaller screens. HD is suitable for basic browsing, office tasks, and watching standard videos. However, text and images may look less sharp on larger displays.
2. HD+ – 1600 × 900
HD+ provides more pixels and screen space than standard HD. It was commonly used in older laptops and desktop monitors. The picture looks clearer than 1280 × 720, but it is still less detailed than Full HD. It is suitable for everyday work, web browsing, and basic entertainment.
3. Full HD – 1920 × 1080
Full HD, also called 1080p, is one of the most widely used screen resolutions. It offers clear images, readable text, and enough workspace for most users. Full HD is commonly found on laptops, monitors, televisions, and smartphones. It is a good choice for office work, gaming, streaming, and general use.
4. QHD – 2560 × 1440
QHD stands for Quad High Definition and is also known as 1440p. It contains around four times as many pixels as standard HD. This resolution provides sharper text, more image detail, and additional workspace compared with Full HD. It is popular among gamers, designers, editors, and users with larger monitors.
5. Ultra-Wide QHD – 3440 × 1440
Ultra-Wide QHD is commonly used on wide monitors with a 21:9 aspect ratio. It offers more horizontal screen space, making it useful for multitasking, video editing, and immersive gaming. Users can open multiple windows side by side without needing a second monitor. However, some applications and games may not fully support the wider format.
6. 4K UHD – 3840 × 2160
4K UHD contains four times the number of pixels found in Full HD. It delivers highly detailed images, sharper text, and excellent picture quality on large screens. This resolution is common on modern televisions, premium monitors, and high-end laptops. Gaming or editing at 4K may require a powerful graphics card and compatible hardware.
7. 5K – 5120 × 2880
5K resolution provides more detail and workspace than 4K. It is mainly used in premium monitors designed for graphic design, photography, video editing, and other professional work. The extra pixels allow users to view high-resolution content while keeping editing tools visible. However, 5K displays and supporting hardware can be expensive.
8. 8K UHD – 7680 × 4320
8K UHD offers four times the pixels of 4K and sixteen times the pixels of Full HD. It provides extremely detailed images, especially on very large screens. However, 8K content is still limited, and most everyday users may not notice a major difference at normal viewing distances. It also requires advanced hardware, high-speed connections, and large amounts of storage.
9. Mobile Screen Resolutions
Smartphones use several resolution types, including HD+, Full HD+, QHD+, and higher custom resolutions. The plus sign usually means the screen is taller than the traditional 16:9 format. Because phone screens are small, pixel density is often more important than resolution alone. A Full HD+ smartphone can still look extremely sharp because its pixels are packed closely together.
The best resolution depends on screen size, device performance, and intended use. Full HD is suitable for most everyday users, while QHD and 4K are better for larger screens, professional work, and detailed content.
5. How to Check Screen Resolution in Windows 11
Learning How to Check Screen Resolution in Windows 11 is simple because the current setting is available directly in Display Settings. You can also check the recommended resolution, scaling level, refresh rate, and active signal resolution. Follow these steps carefully, especially when multiple monitors are connected.
1. Open Display Settings
Right-click an empty area of your desktop. Select Display settings from the menu that appears. Windows 11 will open the Display section inside the Settings app.
You can also open it manually by following this path:
Start > Settings > System > Display
2. Select the Correct Display
If you use only one screen, Windows will automatically show its settings. When two or more monitors are connected, numbered display boxes will appear at the top. Select the screen whose resolution you want to check.
Click Identify when you are unsure which number belongs to each monitor. A large number will briefly appear on every connected screen.
3. Find the Scale and Layout Section
Scroll down until you reach the Scale & layout section. This area contains options for display scaling, screen resolution, and screen orientation. Make sure you are still viewing the settings for the correct monitor.
4. Check the Current Display Resolution
Look for the Display resolution option. The value shown in the box is the resolution currently being used by Windows 11. For example, it may display:
- 1366 × 768
- 1920 × 1080
- 2560 × 1440
- 3840 × 2160
The first number represents horizontal pixels, while the second represents vertical pixels.
5. Find the Recommended Resolution
Open the Display resolution drop-down menu and look for the option marked Recommended. This is usually the screen’s native resolution and normally provides the clearest text and images.
For example, Windows may display:
1920 × 1080 (Recommended)
Using a lower resolution can make content look blurry, stretched, centred, or surrounded by black borders. Microsoft also recommends using the option marked Recommended in most situations.
6. Check Advanced Display Information
For more details, scroll down and select Advanced display. This section shows information such as:
- Desktop mode resolution
- Active signal mode resolution
- Refresh rate
- Display model
- Colour format
- Bit depth
The desktop mode shows the resolution Windows uses for the desktop. The active signal mode shows the resolution being sent to the monitor through the cable or display connection.
7. Compare Desktop and Active Signal Resolution
In most cases, the desktop mode and active signal mode should match. For example, both may show 1920 × 1080. When they are different, the graphics card, cable, adapter, or monitor may be scaling the image.
A difference does not always indicate a serious problem. However, it may explain why the screen looks blurry, stretched, or less detailed than expected.
8. Check Each Connected Monitor Separately
Windows 11 allows every connected display to use a different resolution. Return to the main Display Settings page and select another numbered monitor. Then check its Display resolution and Advanced display information separately.
This is important when using a laptop with an external monitor. The laptop may use Full HD, while the external screen may support QHD or 4K.
9. Avoid Confusing Resolution With Scaling
The Scale option changes the size of text, icons, and applications. It does not change the physical pixel count of the screen. Common scaling settings include 100%, 125%, 150%, and 200%.
When text looks too small, increase the scaling percentage instead of lowering the resolution. This keeps the image sharp while making screen elements easier to read.
10. Fix a Missing Recommended Resolution
When the recommended resolution is missing, check for Windows and graphics-driver updates. Go to:
Start > Settings > Windows Update > Check for updates
You should also confirm that the display cable, port, and adapter support the required resolution. Microsoft notes that unexpected resolution changes may sometimes require a graphics-driver update.
After checking the setting, keep the resolution marked Recommended unless you have a specific reason to change it. This usually provides the sharpest text, correctly shaped images, and the best overall picture quality.
6. Important Tips
Checking and managing screen resolution is simple, but small mistakes can make text, images, and videos look blurry. Always use the recommended settings and adjust scaling separately when text feels too small. These tips can help you get clearer picture quality and avoid display problems.
- Use the resolution marked Recommended
- Check each connected monitor separately
- Keep graphics drivers updated
- Adjust scaling for better readability
- Use compatible cables and adapters
- Match resolution with the correct aspect ratio
- Avoid unsupported custom resolutions
- Restart the device after major changes
- Check the monitor’s native resolution
- Use official display specifications when unsure
Open the display settings on your computer or device. Look for the option called Display resolution or Resolution. The selected numbers show your current screen resolution.
It means the screen displays 1920 pixels horizontally and 1080 pixels vertically. This resolution is commonly known as Full HD. It is suitable for everyday work, gaming, and video streaming.
Yes, the recommended option is usually the screen’s native resolution. It normally provides the clearest text and sharpest images. Lower resolutions may make content appear blurry or stretched.
Higher resolutions provide more screen space, so text and icons may appear smaller. You can increase display scaling without reducing the resolution. This keeps the screen sharp while improving readability.
An outdated graphics driver, unsupported cable, or faulty adapter may limit resolution options. Update the official graphics driver and check the display connection. Restart the device and review the resolution settings again.
No, screen size is measured diagonally in inches. Screen resolution describes the number of pixels displayed horizontally and vertically. Two screens of the same size can have different resolutions.
Selecting a supported resolution normally does not damage the display. An unsupported setting may temporarily cause a blank or distorted screen. Use the recommended option and avoid unsafe custom resolutions.
Conclusion
So guys, in this article, we’ve covered How to Check Screen Resolution in detail. Checking the correct resolution can help improve image quality, text clarity, and overall screen performance. Personally, I recommend using the resolution marked Recommended and adjusting display scaling when text or icons look too small. Open your display settings today and make sure your screen is using the best available resolution.

- Be Respectful
- Stay Relevant
- Stay Positive
- True Feedback
- Encourage Discussion
- Avoid Spamming
- No Fake News
- Don't Copy-Paste
- No Personal Attacks
- Be Respectful
- Stay Relevant
- Stay Positive
- True Feedback
- Encourage Discussion
- Avoid Spamming
- No Fake News
- Don't Copy-Paste
- No Personal Attacks
